Showing posts with label Paper Craft. Show all posts

How To Fold A Paper Boat

Let’s come back to our childhood with a simple Paper Boat and here is how to fold a paper boat:


How To Fold A Paper Boat


How To Fold A Paper Boat simple
Step 1: Firstly, fold the half paper along the length.


How To Fold A Paper Boat 1
Step 2: Then keep on turning the paper around and fold it again.


How To Fold A Paper Boat 2
Step 3: When finish folding, open the paper to have the lines like in the picture. Only open once, the paper in the picture still is the one in step 1.


Simple way to fold a paper boat
Step 4: Fold an angle inside along the line. - How To Fold A Paper Boat


Simple way to fold a paper boat 1
Step 5: Do the same with the other side.


How To Fold A Paper Boat 3
Step 6: Fold a part onto the part you’ve fold..


How To Fold A Paper Boat 4
Step 7: …and the same with the other side. - How To Fold A Simple Paper Boat


Simple way to fold a paper boat 2
Step 8: Let your thumb through the hole in the middle of the paper, use the forefinger to fold like in the picture. The part which is pointed..


How To Fold A Paper Boat 5
Step 9: ..fold the right part down, the left one up.


Simple way to fold a paper boat 3
Step 10: Put a part of paper and fold it up.


How To Fold A Paper Boat 6
Step 11: Do the same with the other side. - How To Fold A Paper Boat


How To Fold A Paper Boat 7
Step 12: The same with Step 8.


Simple way to fold a paper boat 4
Step 13: If you follow all the steps , you’ll have one like in the picture.


How To Fold A Paper Boat 8
Step 14: Softly pull 2 angles of it out. - How To Fold A Simple Paper Boat


How To Fold A Paper Boat 9
Step 15: Fold it, roll it to make it harder.

You’ve already fold a simple Paper Boat. The tip is fold the right line and be careful then the boat will not be wrong.

Please Check out Here for more Homemade toys from cardboard and paper .

www.easyDIYtoys.com – How To Fold A Simple Paper Boat.

Handmade paper pinwheel welcoming the summer wind

In the peaceful summer days, the cool winds from somewhere come and cool down the heat. So why not enjoy these winds by the simple yet interesting handmade paper pinwheels?
 
simple handmade paper pinwheel
 
It’s easy to make but not everyone knows or maybe forgets how to make a paper pinwheel. Let’s with www.easyDIYtoys.com make a Handmade paper pinwheel welcoming the summer wind!
 
 
handmade paper pinwheel
Preparation for the Handmade paper pinwheel: Color papers, scissors, bamboo sticks, glue, small nail.


How to make Handmade paper pinwheel:
 
How to make Handmade paper pinwheel
Cut a square from the beginning color paper, the size of it is up to that of the bamboo stick used to make pinwheel.
 
 
easy Handmade paper pinwheel
Fold the square along the lines into a triangle then one more time fold the triangle, when open, we have a square with the lines like in the picture.
 
 
Handmade paper pinwheel simple
Use the scissors to cut along the lines, notice that only cut ½ of the lines, not the whole. Then pull the head into the center, glue the four heads each on each other, like in the picture.
 
 
Handmade paper pinwheel easy
Make a small hole through the center where the four heads were glued and through the other side, put a part of a straw into it, then use the nail to go through the hole on the straw, pin it into the head of the bamboo stick.
 
So you just know how to make a simple handmade paper pinwheel. Make yourself this handmade paper pinwheel pin into all windows, gardens to welcome the summer winds.
 
www.easyDIYtoys.com -  Handmade paper pinwheel welcoming the summer wind.

Handmade Toy Air Balloon

Making handmade ornaments like this look really cute right! Let fly with his homemade toy air balloon.

Handmade Toy Air Balloon

Materials for making toy handmade air balloon:
  • Paper globe if there is not then you can use the plastic ball / Christmas globe.
  • Acrylic color for the globe paper, or  paint for plastic ball.
  • Thin cardboard, wool, copper wire, glue, sewing needles.

How to make the toy air balloon:

Handmade Toy Air Balloon 1
Step 1: Color, paint your globe, make a hanger hook for each one.


Handmade Toy Air Balloon 2
Step 2: Fold your cardboard in to square box to make the passenger room.


Handmade Toy Air Balloon 3
Handmade Toy Air Balloon 4
Step 3: Glue the cube wire on the box wall like the pictures above.


Handmade Toy Air Balloon 5
Step 4: Roll the wool alternate with the cube wire tight around the box.


Handmade Toy Air Balloon 6
Step 5: Glue to fix the wool's end.


Handmade Toy Air Balloon 7
Step 6: Bend the protruding part of the copper wire inside, paste 1 other wool wire with different colors on the paper box boder. So we've done the passenger room of the handmade toy air balloon.
Handmade Toy Air Balloon 8

Handmade Toy Air Balloon 9
Handmade Toy Air Balloon simple
Step 7: sewing needle threaded the wool rope to cross 4 corner of hanging paper box.
Handmade Toy Air Balloon easy
Step 8: knot the 4 ending of the wool ropes, paste the top rope into the globe by a right angle.
 
Handmade Toy Air Balloon guides
Great! you've made yourself a handmade toy air balloon. this must be a cute decoration for your corner.

 
www.easyDIYtoys.com - Handmade Toy Air Balloon.

Simple Crafts Paper Flowers-cart

A DIY Crafts Paper Flowers-cart like this can be a gift in Valentine, Women’s Day or birthday for your girlfriend. It’s up to the topic that you can change the kind of flower you like on your crafts paper cart to make it suitable.
Crafts Paper Flowers-cart

Preparation to make the DIY Crafts Paper Flowers-cart: Hard paper, arcylic colors, colorful paper, white glue (Elmer glue), paper-knife.

How to make a Crafts Paper Flowers-cart:

Part 1: Make the body of the DIY paper cart:
paper crafts
Step 1: Cut the hard paper into the pieces with the size like in the picture to make the body for our paper-flowers cart.
DIY paper flowers cart
Step 2: Use the paper-knife to cut lightly to make slots on 4 cart walls to make them look like made from the wood. Cut small, long sticks then glue them on the cart walls.
crafts paper cart

Step 3: Glue and fit the walls and the bottom into a finishing cart body.
DIY paper toys

Step 4: Cut the paper into 2 small stick, make the hole like in the picture to make the place to attach the wheel.
Cut 2 long paper to make the handle for the DIY crafts paper flowers cart.

So you’ve done with the cart's body, you can paint the colors on it to look lovely and make it stable, stronger. You ought to come up with the theme of decoration to be suitable to each holiday like Valentine, Women’s Day, her birtday ...

Part 2: Making the wheels for handmade paper flowers cart:
how to made crafts flowers cart
Step 1: Stick the 2-sides glue on the papers, draw and cut out 8 circles with the inside diameter 7.5cm; the outside is 8cm. Stick the done 4 circles with each other, we’ll make a handmade wheel.
Crafts Paper Flowers-cart simple
Step 2: Cut the small piece with the size 4*0.5cm to make the spoke. Each spoke will need 8 piece like this. Cut a small circle, glue the spokes around, then cut 1 more circle like that and stick it on to cover the connect of the spokes. Do the same with other handmade wheel of our DIY paper flower cart.
crafts paper flowers
Step 3: Use a small stick to put through and attach wheels into the cart's body. Cut 1 more small paper stick and glue it at the head to make the cart's stand. 
easy Crafts Paper Flowers-cart

So you’done with the DIY crafts paper flowers cart. Changing the theme of flowers to make handmade gifts for your girlfriend on Valentine, Women’s Day, birthday is just cute, isn’t it? :>

www.easyDIYtoys.com – Crafts Paper Flowers-cart.

Homemade Valentine Cards

No need of the expensive and complicated gifts for Valentine, you just need to some Valentine chocolates and a little cleverity to making yourself Homemade Valentine Card like this, your love will be surprising and full of happiness in Valentine’s Day.
Homemade Valentine Cards


Preparation: Hard colored paper to make the background, hard white paper to make the 3D letters, markers, ruler, paper-knife.

How to make a Homemade Valentine Card:
handmade Valentine cards
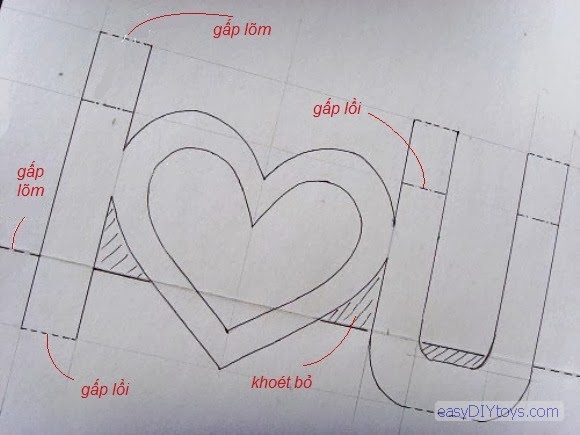
Step 1: Print or draw the form on the paper to get ready, the size is based on the size of the Handmade Valentine Card you want to make.
DIY Valentine gifts
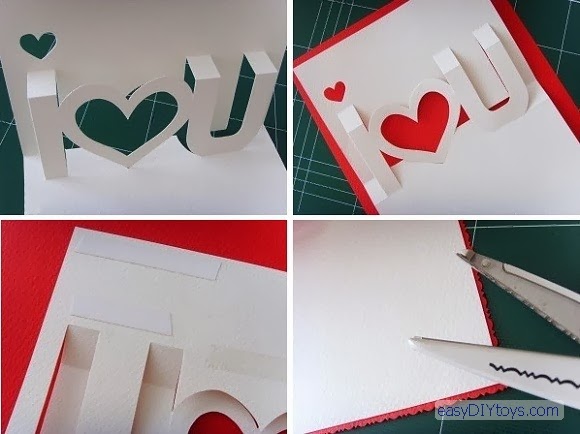
Step 2: Cut along the lines, cut away the crossed, you may cut away the small heart inside or put in a sticker photo. The dash lines are the ones to make the 3D for the Handmade Valentine Card.
Homemade Valentine Cards
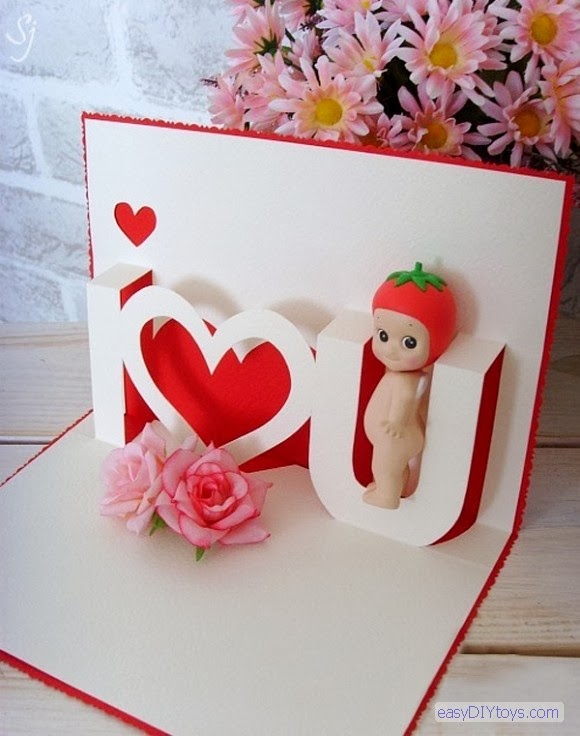
Step 3: Put the white paper in step 2 like in the picture to imagine the up 3D letters. Glue the down ones into the hard paper by the liquid glue or 2-sides glue. You can make the pattern for the Handmade Valentine Card if you want.
Handmade Valentine cards 2

So you’ve done with a Homemade Valentine Card for your love in the coming Valentine. When giving this Handmade Valentine Card, you can give also some small other gifts to decorate this card. So when opening this card, the decoration will appear to boost the 3D to make the card more lively. It can be showed on the shelve or a corner.
Homemade Valentine Cards 2

It’s no need buying presents for Valentine, isn’t it? A Handmade Valentine Card like this will definitely let your love show forever on her/ his corner, never close it again!

www.easyDIYtoys.com – Simple Handmade Valentine Card.