Showing posts with label DIY toys. Show all posts

Homemade Angry Birds toy set from tin cans

Homemade Angry Birds ToyYour baby will definitely like this homemade Angry Birds toy set. Making such this toy for exercise will help the baby to get away from the computer games and run and jump as well as the exercise and eyes’ skills.

In addition, you’ll have good time when yourself making the handmade Angry Bird toys for your baby.

Preparations for your homemade Angry Birds Toy Set: Lots of tin can, 1 plastic ball, green color (the color of the pigs in Angry Bird); black, white, red color, white paper, marker.

How to make Homemade Angry Birds Toy Set:

Step 1: In this step, we’ll make the pigs in Angry Bird Toy like these.
handmade toys from tin cans 

homemade angry birds toy set
Use the marker to draw the eyes, noses and mouths of the pigs in the paper, notice that the size of the face will fit with your cans. Then cut the faces of the pigs.
Homemade toys from tin cans
Put the faces into the tin cans which are already painted green. Use the marker to draw the dashed line along the face.
DIY angry birds toy
According to the done lines, paint the noses for the pig tin can toys.
Homemade Angry Birds toy set from tin cans
Use the white color to draw the eyes for the pigs.
DIY toys from cans
Use the black and red color to draw the rest.
So we’ve done with the pigs for the homemade Angry Birds toy set. With lots of tin cans, you should draw different emotions for the pigs so this handmade DIY tin can toys will be more lovely.
 
Step 2: Handmade Angry Birds _ the main character in our homemade Angry Bird toys.
Handmade angry Birds toy

homemade Angry Birds toy
The same as the way we make the tin can toy pigs, you also draw the faces of the Angry Bird into the paper and the dashed lines like in the picture.
DIY angry birds toys

homemade kid toys
Then complete the face of the Angry Bird for the handmade Angry Bird toys.

Your baby will chase after these birds and arrange the falling pigs. So this will be the simple but very effective homemade Angry Bird toys for your baby.
homemade toys from tin cans DIY

So we’ve done with the handmade Angry Bird toys for your baby. You can also create some wooden toy walls to make it harder for baby. If these DIY toy pigs are too easy to fall, you can also add in something inside to make them heavier, harder to fall.

Wish you have the relaxed time with this homemade Angry Birds toy set as well as interesting time when playing this handmade Angry Bird toys with your baby!

www.easyDIYtoys.com -  Homemade Angry Birds toy set from tin cans.

How To Make A DIY Toy Guitar From Paper Boxes

DIY Toy GuitarHandmade Paper Box Toy Guitar.
With the used boxes, you can make simple but funny DIY toys for your baby. Apart from the funny and interesting form, this DIY handmade guitar toy from paper box also sounds quite good, which can help your baby improve music sense. Let’s make this handmade guitar toy from paper box!

Materials for the DIY Toy Guitar from paper box:

handmade toys from paper boxes
1 cardboard box, 2 paper tubes, some big elastic band, 1 small piece of plastic to make the frets, some plastic/ bamboo sticks, paper-knife or saw.
 
How to make the DIY Toy Guitar from paper box:

DIY toys from paper boxes
Step 1: Use the paper-knife or saw to make a circle hole on the box (better off drawing the circle then cut it).


DIY paper toy guitar

Handmade toys from paper
Step 2: Turn to the next side, make a hole with the diameter as same as the cardboard tubes to make the handle of the DIY toy guitar. Then put the tube to make the handle of handmade guitar toy in it.


DIY toy guitar paper
Step 3: Cut along the tube into 2 ½ pieces.


handmade paper toys
Step 4: Glue this tube into the bottom of the DIY toy guitar, attach the plastic/ bamboo sticks to decorate.


How To Make A DIY Toy Guitar From Papaer Boxes
Step 5: Tie 2 sides of the band into 2 plastic sticks then pin into 2 sides of the guitar like in the picture to make the strings. Do the same with the other bands.


easy DIY paper toys
Step 6: Pin the plastic/ bamboo sticks into the handle of the DIY handmade toy guitar to make the sound control buttons.
Use the decal or color paper or you can draw on it to decorate your handmade guitar toy from paper box more lively.

More DIY toys from paper boxes here: 
4 Homemade paper kitchen toys for your babies
10 Ideas and Details Guides For Homemade Paper Toy Houses

www.easyDIYtoys.com -  How To Make A DIY Toy Guitar From Papaer Boxes.

Homemade toy gun from wood and bamboo

This homemade toy gun is very easy to make and simple to play. The gun sounds clack when playing, which is quite funny. Here easyDIYtoys.com just show you how to make handmade gun toy from wood. However, you can create for yourself many other gun models nicer, stranger that you can think of such as: pistol toy, AK toy, the modern gun toy models.. If your baby under 3 years old, I suggest that you should make the short gun toy because it’ll be safer and easier to hold.


homemade wooden toy gun
How to make handmade toy gun from wood and bamboo: This handmade gun toy from wood and bamboo includes 2 parts: The body and the machine.

How to make the body: 

DIY wooden toy gun
+ Zoom out the picture in a big-sized paper, each square is 3cm long, so the length of the toy gun is 45cm.

+ Paste the picture on  the an about 2cm thick wooden board.

+ Use the saw to cut the gun along the picture. Use the punch or knife to cut the difficult corner, notice to cut the barrel and the stock roundly so that your baby will feel comfort when holding and more interested.

How to make the machine for homemade toy gun from wood: 

simple homemade wooden toy gun
The machine includes 2 parts: the saw-toothed wheel and the reed.

a/ The wheel: Draw a circle with the diameter 6cm into the wood 1cm thick. Divide the circle into 8 equal sides. Draw the saw-tooth 1cm deeper (a).

Stick a long pin (a nail) in 1 side of the wheel to make the handle for it.

b/ The reed: Choose a part of bamboo which still has the cover (bamboo splints), cut to take a part 6cm long, 2cm thick, 2cm wide. Sharpen the bamboo into the shape like in the picture, notice that the cover turns down (b).

When complete the parts, then fit them into the body of handmade gun toy. Stick the saw-toothed wheel into A point, the reed into B point. Put the reed to fit in the wheel. Then when the wheel’s rolling, the reed sounds clack, is OK. Add a small button into the barrel to make the foresight for your DIY wooden toy gun.

Now you can “shoot” clack clack with your baby with this simple handmade gun toy from wood.


Even more homemade toy gun:

Homemade Potato Air Toy Gun

Homemade Potato Air Toy Gun

Homemade Click - Clack Toy Gun

Homemade Click - Clack Toy Gun

www.easyDIYtoys.com - Homemade toy gun from wood and bamboo.

Handmade toy motorbike from lighters

handmade toy motorbike from lighterYou wanna make handmade DIY toys? Wanna make yourself the cute motorbike like this!? Follow the structure below :>


Preparation: 2 lighters TOTALLY OUT OF GAS (otherwise it will explode while making) and glue.  
DIY toy motorcycle from lighter

easy diy toys
How to make your handmade toy motorbike from lighter:

turm cigaret lighter into toy motor cycle
Step 1: Pick out these items of the lighter: 1, 2, 5, 6, 7, 8 each kind 2 items. Apart from 4, pick just one, remove the other's plastic part. Item 3 just need one. 

how to make DIY toy motor
Step 2: Nest number 1 into number 2 to make 2 couples, then stick in (like the picture) to make the chassis of the handmade toy motorbike.

handmade toy motorbike from cigaret lighter
Step 3: Stick number 3 in the front to make its front part. Then nest number 4 into the spring 5. After that, put number 4 into the hole in number 2, then nest into another spring 5 and cut stick 4 shorter. Stick other number 4 in it and bend 2 heads of the stick .


Easy DIY toy motor
Step 4: Put number 6 into number 7 as in the picture. Then stick it in the bottom of the motorbike to make 2 tailpipes for the handmade toy motorbike.

DIY handmade toy motorcycle
Step 5: Stick number 8 into 2 holes to make wheels of the motorbike.

So you’ve made a nice handmade model of toy motorbike for your working corner.

handmade toy motorcycle lighter
You can also make nice license plate or electronic clock for them. :”>
www.easyDIYtoys.com - Handmade toy motorbike from lighters.

Handmade humming top toys from CD boxes

DIY toys from CD boxes
Guide for making yourself a handmade humming top toy from CD boxes. With this homemade toys, you can do it yourself as well as ask baby to join in to improve the skills for them.

What you need to prepare to make a homemade humming top toy (spinning top toy):
A CD box, 1 plastic spoon in the milk box, 1 part of old point pen, wool rope, white paper, color pen, scissors.

How to make this handmade humming top toy ( spinning top toy):

Step 1:
Put the CD box on the white paper, draw a circle along the cd box, color and decorate it, then cut it along the circle line.

Make a hole in the middle of that circle, make many circles to replace while playing.

Step 2:
Put the part of point pen into the hole in the bottom of CD box, then nest the circle in Step 1 in it.

Step 3:
Cover the wool rope around the point pen.

Shoot the spoon up the pen and pull.
And finally, let’s see our DIY handmade humming ( spinning )  top toy swiveling.
You can make many others to have a competition and find which homemade humming top toy is swivel longer.
Or you can spin your DIY spinning top toy by hand without the spoon and wool rope.
Finally, all the parts of your homemade humming top toy can be kept in CD box, very convenient to take and play everywhere.


www.easyDIYtoys - How to make a DIY handmade humming top toys from CD boxes.

Easy DIY Toys - Homemade Fishing Toys

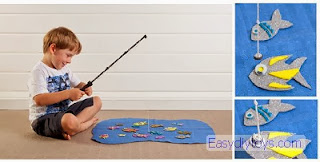
This topic will show you how to make a very easy diy toys for your kid. With the criteria of ‘www.easydiytoys.com’ that ‘Simple – Easy – Unique’, let’s do it yourself.
Easy DIY Toys

Preparation for this easy DIY fishing toy:
- Foam
- Fish-shaped paper from foam or cardboard.
- Stick from bamboo or wood
- 2 sides sticker
- Magnet
- Small bolts
- Parachute cord

How to make this easy DIY fishing toy:
easy diy handmade toys
Step 1: Notes: If you intend to make rods from bamboo, you needn’t paint it black cause those rods are very natural themselves.
Easy DIY fishing toy
Step 2: Tie the magnet into a parachute cord, you can also put small bolts into it. It will look better.
Easy diy toy guides
Step 3: Cut the foam/ cardboard paper into fishes, shrimps, crabs, starfishes… then decorate them and stick metal bolts to make eyes (this will stick in hooks_the magnet) or you can attach pins to make its mouth. This pin will also stick in the magnet while fishing.
guides foy DIY toys
Step 4: Finally, make a pond for the DIY fishing toys.

DIY easy fishing toys
Your babies will absolutely find this very interesting. These DIY handmade toys will improve the imagination, creativity and saving thoughts for your babies.

www.easydiytoys.com - Easy DIY Fishing Toy.